How to master PDF mark-up annotations & comments
Proofreading a PDF and proofreading a Word document requires a slightly different approach because, unlike a Word document, a PDF isn’t a source document. The original document is created and laid out using another piece of software, such as Word or InDesign, then converted to PDF so that it can be easily shared, printed or published, but can’t be modified.
This article will walk you through the annotations your proofreader uses when working with a PDF and explain how you can deal with their notes and suggestions.
Key takeaways
PDFs are not source files, so proofreaders cannot edit them directly. Instead, they use annotations and comments to flag corrections and suggestions for you to apply in the original document.
Proofreaders typically use Adobe Acrobat’s Comment tools—such as insert, replace, delete, highlight, sticky notes, and text boxes—to communicate required changes and queries.
Clicking a comment highlights the relevant part of the text, and selecting an annotation opens the associated comment, making navigation between issues straightforward.
Once you receive the marked-up PDF, the proofreader’s role is usually complete. You then apply the suggested edits in the original file and generate a new PDF version.
Features such as replies, status labels (e.g. accepted or completed), checkmarks, and cautious deletion allow you to organise and monitor how comments are handled—especially in collaborative reviews.
When proofreading a PDF, your proofreader does not apply changes to it directly like they would when proofreading a Word document (see How to use Track Changes). Instead, they will advise you of any corrections and amendments, or raise other queries and suggestions for improving the document, using the Comment feature in Adobe Acrobat Reader DC (free PDF software readily available for download from the Adobe website).
When you get your proofread PDF back, you will then need to return to your source document to make the necessary amendments. Once this stage is complete, you can create a new version of your PDF.
Using the Comment option
When you open your proofread PDF in Adobe Acrobat Reader DC, you’ll see a menu on the right of your screen – the Comment option is the feature used by your proofreader to annotate your PDF. Select this option to reveal their queries and suggested amendments in the comment pane, which will open up on the right side of your screen.
Along the top of your document, you will see the Comment toolbar. This toolbar contains all the tools you need to mark up text and images in your PDF. You can also personalise your toolbar by right-clicking on it and selecting Customize Comment Tools.

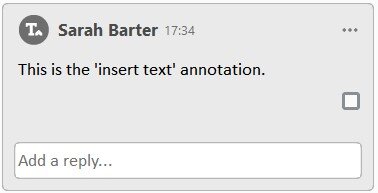
Your proofread document will be annotated in the main body of the PDF, with a matching comment box for each annotation displayed in the comment pane. The comment box shows an icon in its top-left corner which represents the annotation on your document, along with a section showing any other information your proofreader wants to tell you. There is also space for you to add a reply, along with other options accessible from the comment's menu. But more on that later...
Identifying the mark-ups
Clicking on any of the comment boxes will take you to the relevant annotation in the text, shown in a blue box. Conversely, clicking on an annotation will take you to its comment box in the comment pane. It will stand out with a grey background.
What do the tools do?
These are the most frequently used tools – read on to find out how they are used and how they display on your PDF.
Tools for amending your text
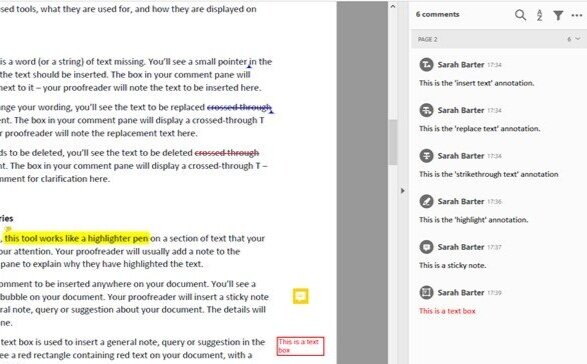
Insert Text: This is used if there is a word (or a string of text) missing. You’ll see a small pointer in the place on your document where the text should be inserted. The box in your comment pane will display a T with a small pointer next to it – your proofreader will note the text to be inserted here.
Replace Text: If you need to change your wording, you’ll see the text to be replaced crossed through with a blue line on your document. The box in your comment pane will display a crossed-through T followed by a small arrow – your proofreader will note the replacement text here.
Strikethrough: If any text needs to be deleted, you’ll see this text crossed through with a red line on your document. The box in your comment pane will display a crossed-through T – your proofreader may add a comment for clarification here.
Tools for adding notes and queries
Highlight: As the name suggests, this tool works like a highlighter pen on a section of text that your proofreader wants to bring to your attention. Your proofreader will usually add a note to the comment box in your comment pane to explain why they have highlighted the text.
Sticky Note: This tool allows a comment to be inserted anywhere on your document. You’ll see a square box containing a speech bubble on your document. Your proofreader will insert a sticky note if they want to leave you a general note, query or suggestion about your document. The details will be displayed in the comment pane.
Text Box: Like the sticky note, a text box is used to insert a general note, query or suggestion in the body of your document. You’ll see a red rectangle containing red text on your document, with a matching note in your comment pane.
How I use the tools to annotate a PDF
Different proofreaders will mark up your PDF in their own way – this is how I like to do it!
I generally use the highlight tool to draw your attention to any text that needs to be amended or that I am querying. I find this to be the most useful way for you to see my comments. Using the highlighter means you can easily see the text I am querying – the tools for amending text can sometimes get a bit lost and difficult to spot.
If there are areas in the PDF I want to point out for consideration, or if I want to leave you a general note, I will use the sticky note tool (rather than the text box) added directly to your document.
As I said, this method is just my preference – if you would prefer I use the other markup tools to show insertions, deletions, and substitutions, I’m happy to do so. Just let me know during our discussions about your project's requirements.
Dealing with the comments
The return of your proofread PDF usually marks the end of the proofreader’s involvement. It’s now down to you to implement the flagged amendments on your source document. You may already have a system for dealing with the comments, but if not, then read on!
The comments box
Replying to a comment
When you click into a comment box, you’ll notice a white box where you can add a reply. This is particularly useful if you are reviewing the document as a group. When you’ve added your reply, another response box appears below so that someone else can add theirs. If you’re reviewing the document by yourself, it’s also useful for keeping track of your thoughts about particular comments from your proofreader.
The comment box menu
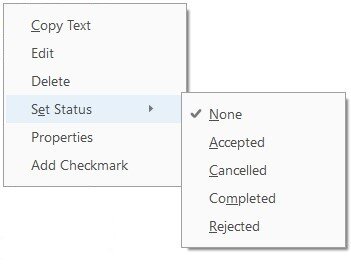
This menu can be accessed by clicking the three dots icon in the top right of the comment box or by right-clicking anywhere in the comment box. From here, you can choose to copy text or edit the comment, delete the comment, set the status of the comment and add a checkmark.
Set Status: These options give a visual representation of how you want the comment to be actioned. There are five to choose from: None, Accepted, Cancelled, Completed and Rejected.
Add Checkmark: If you don’t set a status, this is another good way of showing a visual representation of the comments you’ve dealt with. Selecting this option from the menu adds a blue tick to the comment. To remove it, click into the menu again and you’ll see the option to Remove Checkmark (or hover your mouse over the box and left-click).
Delete: Use with caution! Bearing in mind that you need to use the annotated PDF to amend your source document, you should only delete a comment if you’re absolutely sure you no longer need the mark-up on your document. It’s usually far better to use the status or checkmark options, especially if you’re working on the document with colleagues.
Final thoughts
I hope this article has helped your understanding of the mark-up that’s been used on your proofread PDF. Do remember that your proofreader or editor is always on your side – they are not trying to make you feel bad by splashing marks all over your text!
The sole aim of any proofreader is to assist you in making your document easily understandable for your intended audience.
Don’t forget, if you want to get a professional look and feel for your writing or designs, get in touch for your free, no-obligation quote.
I’m here to help you with the proofreading and editing for:
your website, blog or social media
your printed marketing materials (flyers, posters, business cards, menus, price lists, etc.)
your essay, dissertation or thesis
your CV and cover letter for that important job application.
Frequently Asked Questions
-
Because a PDF is a finalised output created from another programme, proofreaders instead provide corrections through annotations and comments rather than direct edits.
-
Typical tools include insert text, replace text, strikethrough, highlight, sticky notes and text boxes. Each one serves a different purpose for amendments or queries.
-
Selecting a comment jumps to the related annotation in the text, and clicking the annotation opens its matching comment in the pane.
-
Review the comments, apply the suggested changes in your source document, and then create an updated PDF once revisions are complete.
-
You can reply to comments, set statuses such as accepted or completed, add checkmarks, and only delete comments when you’re certain they’re no longer needed.

Hi, I’m Sarah – welcome to my blog!
Take a look around for resources and tips on writing, editing and proofreading.