Your guide to using Track Changes in Word
Track Changes is a great function in MS Word that allows the author (you!) to review all suggestions and amendments made to their document by their proofreader or editor. The author can then choose to either accept or reject each revision, and also act (or not... ) on any suggestions that have been made.
This article provides step-by-step instructions to talk you through the various menu options available to you in Track Changes.
Key Takeaways
Track Changes shows every edit your proofreader makes, including insertions, deletions and comments, so you can review each suggestion before you decide to accept or reject it.
Use the View options (Simple Markup, All Markup, No Markup and Original) to control how much detail you see when reviewing the edits.
You can filter what you see by toggling comments, insertions, deletions and formatting on or off in the Show Markup menu.
Accepting or rejecting changes can be done one by one, in groups or all at once; these actions are final, but you can undo them before saving if you make a mistake.
Comments are optional and informative; you can resolve them to grey them out, delete individual comments, or remove all comments once you’ve read them.
1/ Reviewing the changes
On opening your document, and before making any edits, your proofreader will switch on Track Changes. This function records every deletion and insertion made to your text, and also allows comments to be added to your document. Comments from your proofreader may include notes and advice, queries if your text isn’t clear, and suggestions on how you can improve it.
When you receive your proofread document, you should always read it thoroughly to check the amendments and comments the proofreader has made. You will be able to see every spelling correction, every word inserted or deleted, and every suggestion your proofreader has made to improve the clarity and conciseness of your document.
When you get your marked-up document back, open it up and check that it’s in Print Layout (found under View on the ribbon). Don’t be alarmed if your document is covered in red! It may look confusing if you’re not used to using Track Changes, but once you know how it all works, you’ll see what a useful function it can be.
Tracking section
Select Review on the ribbon to access the Review toolbar. This menu gives access to a number of sections:

(Please note: in newer versions of Word, the spellchecker is now called Editor.)
In the Tracking section, you’ll see a drop-down menu. From here, you can select how you view the edits:
Simple Markup: This view is the least complicated. It flags any changes made with a vertical red line in the left margin of your document and shows comments in a column to the right of your screen. Click on a red line to expand your view to All Markup.
All Markup: This is a detailed view of every change made to your document. Here is where you’ll see insertions underlined and deletions crossed through. Insertions are generally shown in blue and deletions in red. Comments will be visible in a column on the right side of your screen.
No Markup: This view shows your document as it would look should you choose to accept all the amendments. You will not see any tracked changes or comments.
Original: This view shows your document as it was before any amendments were made. You will not see any tracked changes or comments.
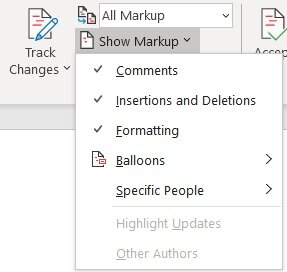
Once you have chosen the markup type from this menu, click on the Show Markup menu. Here, you can select which revisions to view by ticking or unticking the options for Comments, Insertions and Deletions, and Formatting. You can check each revision type individually, all at the same time, or in any combination of the three.
Next, the Balloons menu allows you to choose how to display the edits within your document. You can view balloons in the column to the left of your document, or inline revisions within the body of your text.
Finally, the optional Reviewing Pane menu allows you to view all revisions either in a column to the right of your document, or in a panel below your document. You can also remove the panel by clicking the top-right cross to close it.
2/ Accepting or rejecting the changes
Changes section
The Changes section allows you to choose which edits you’d like to accept or reject. You can find these options to the left of the Tracking section on the Review toolbar.
Accepting or rejecting an edit removes the underlines and strikethroughs from your document. These are permanent actions, so should only be selected if you are sure. However, don’t worry if you do make a mistake – the keyboard shortcut Ctrl-z will take you back a step! Just make sure you use this shortcut before saving your revised document.
By default, clicking on either the Accept button or the Reject button keeps/removes the amendment and automatically takes you to the next one. If you don’t want to move on automatically, clicking on the little arrow below the button reveals other options:
Accept/Reject and Move to Next
Accept/Reject This Change
Accept/Reject All Changes Shown
Accept/Reject All Changes
Accept/Reject All Changes and Stop Tracking

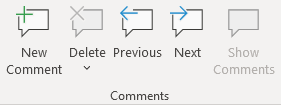
The Previous button takes you back to the previous tracked edit; the Next button moves you on to the next tracked edit.
Comments section
Your proofreader uses comments to make suggestions and to raise queries if there are ambiguities or other questions about your text. You’ll find the Comments section to the right of the Tracking section in the Review toolbar.
When you have read a comment, you can either act on it or not – it’s your document, so it’s entirely your decision. Whatever you decide to do, you may want to get rid of the comment from your document when you’ve reviewed it, or you may want to simply mark it as resolved.
Resolving a comment
This leaves the comment in place, but greys out the text. It’s useful if you want to remember which comments you have dealt with but don’t wish to delete them entirely.
Click on the comment
Select Resolve
Right-click on the comment and select Resolve Comment from the menu.
A resolved comment can be reinstated at any time by clicking on Reopen in the comment box.
Removing individual comments
If you no longer need to see a comment, you can entirely remove it from your document.
Click on the comment
Select the Delete button from the toolbar
Right-click on the comment and select Delete Comment from the menu.
Removing all comments from your document
Click on any comment
Select the arrow below the Delete button
Select Delete All Comments in Document.
Final thoughts
Always remember that your proofreader or editor is on your side – they are not trying to make you feel bad! The sole aim of any proofreader is to help you improve your writing and make it easy for your intended audience to read.
Any errors that might disturb the flow of your writing, or otherwise trip up your reader, are amended or flagged to make your writing clear, concise and easy to read.
To get a professional look and feel for your writing or designs, I can help you with proofreading and editing for:
your website, blog or social media
your printed marketing materials (flyers, posters, business cards, menus, price lists, etc.)
your essay, dissertation or thesis
your CV and cover letter for that important job application
If you need help with your content, do get in touch to discuss your requirements and get a no-obligation quote.
Frequently Asked Questions
-
It’s a feature that records edits and comments so you can see exactly what changes a proofreader or editor has made to your document.
-
Use the Tracking drop‑down in the Review toolbar to switch between Simple Markup, All Markup, No Markup and Original views.
-
Yes. You can review each change individually, skip through them, or accept/reject all shown changes at once.
-
Read them, act on any suggestions you agree with, and then either delete or resolve each comment based on how you want them to appear.
-
Yes. Before you save the revised document, you can use the undo shortcut (Ctrl‑Z) to reverse an accidental action.

Hi, I’m Sarah – welcome to my blog!
Take a look around for resources and tips on writing, editing and proofreading.